
Windows Mobile PDA - Install PersonalSign Certificate
Jul 12, 2020
Windows Mobile PDA - Install PersonalSign Certificate
Installing Your PersonalSign Certificate in Windows Mobile PDA
Article Purpose: This article provides step-by-step instructions for installing your PersonalSign certificate in Windows Mobile PDA. If this is not the solution you are looking for, please search for your solution in the search bar above.
Once you have successfully installed your PersonalSign digital client certificate on your PC it can be copied to your PDA for the purpose of client side authentication from mobiles and other similar applications.
- In Internet Explorer click the gear icon in the top-right corner. Click Internet Options.
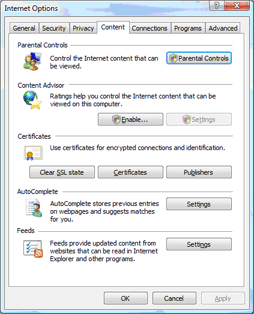
- Click the Content tab. Click Certificates.
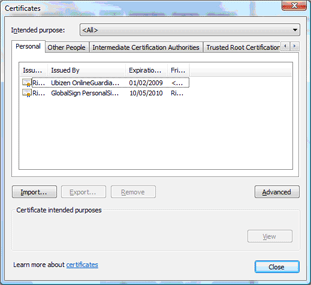
- Select the certificate you wish to export. Click Export. This will start the Certificate Export Wizard.

- Follow the wizard, ensuring that you select Export the Private Key and Include All the Certificates in the Path.
- At the end of the process you will have a ".pfx" file.
- Connect your PDA/smartphone to your PC and copy the ".pfx" file to the device via ActiveSync or the WMDC.
- Install the utility PFXImport.
- Run PFXImport on the device and point it to the ".pfx" file.
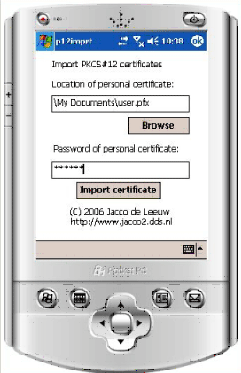
- Enter the ".pfx" file password. Your certificate, along with the others in the path, will be imported onto the device.
Additional Resources:
PFXImport Download: http://www.jacco2.dds.nl/networking/p12imprt.html#Download
Related Articles
SSL Configuration Test
Check your certificate installation for SSL issues and vulnerabilities.
Contact Support
If you are an Atlas portal user, please submit request to support-atlas@globalsign.com.