Generate CSR - Microsoft Management Console (MMC)
Jan 8, 2026
Generate CSR - Microsoft Management Console (MMC)
|
OVERVIEW: This page walks you through the process of creating a Certificate Signing Request (CSR) using Microsoft Management Console (MMC). At the completion of this procedure, you will be able to create your Certificates in MMC. For more CSR guides, please refer to this page. |
Guidelines
-
Open up MMC by typing it on Start Menu.
-
Click File.
-
Click Add/Remove Snap-ins.
-
Select Certificate then click Add.
-
Click OK. Note: If it will ask you which account, choose Current User.
-
Within MMC, click the Certificates node to show contents.
-
Right click on Personal folder.
-
Choose All Tasks > Advanced Operations > Create Custom Request > Next.
-
Select Proceed without enrollment policy under the Customer Request, then click Next.
-
Select PKCS #10 in the Request format field and click Next.
-
Under Custom Request, click Details > Properties.
-
In the Certificates Property screen, provide a Friendly name in the space provided. Note: For the best practice in naming convention, enter the Common Name of the CSR followed by the date to easily identify the certificate and its creation date (Common Name DDMMMYYY). Example: GlobalSign test 06Jan2026.
-
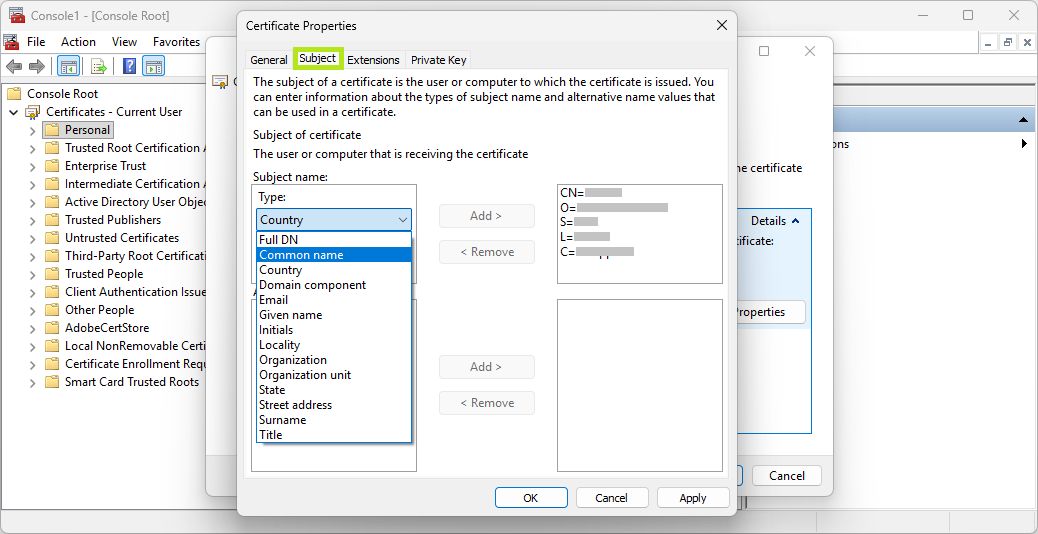
Click the Subject tab, set in the required CSR field types required (Common Name, Organization, Locality, State, and Country), then click Add after providing each of its values.

Field
Description
Common name (CN)
The fully qualified domain name (FQDN) or registered organizational name that the certificate will be issued to and will secure.
Organization (O)
The legally registered name of the organization to which the certificate belongs to.
State (S)
The state or province where the business is registered. Do not use abbreviations.
Locality (L)
The city or locality where the business is registered (not the physical server location).
Country (C)
The two-letter ISO country code.
-
Click the Private Key tab and expand Key options.
-
In the Key size field select 2048. Enable the Make private key exportable option then click OK.
-
Expand Hash Algorithm and select SHA256.
-
Click Apply, then click OK.
-
Click Next.
-
Click the Browse button and select the directory where you want to save the CSR file. Note: The default File format is set at Base 64.
-
Click Finish.
Related Articles
SSL Configuration Test
Check your certificate installation for SSL issues and vulnerabilities.
