
Code Signing Certificate Setup in Azure Key Vault
Feb 12, 2026
Code Signing Certificate Setup in Azure Key Vault
|
OVERVIEW: This page walks you through the process of generating, importing and managing GlobalSign Code Signing Certificate (OV and EV) within Microsoft Azure Key Vault, fully compliant with current CA/Browser Forum requirements (Private Keys stored in FIPS 140‑Level 2+/HSM). At the completion of this procedure, your Certificate will be fully integrated with Azure Key Vault and ready for secure automated use. |
Prerequisites
-
Microsoft Azure account and subscription.
Guidelines
Step 1: Create an Azure Key Vault
-
Log in to the Azure portal, then click Key Vaults.
-
In the Key Vaults home page, click Create.
-
In the Basics tab, enter the name of your key vault in the Name field and choose your Subscription preferences, Resource group (new or existing), Region, Pricing tier, Recovery options. Then, click “Next” to continue.
-
Choose the settings in the Access configuration, Networking, and Tags tabs according to your use case.
-
Once completed, go to the Review + Create tab to review the details you have entered. Then, click Create.
-
Once your vault is created, you will be taken to the Overview home page. To proceed, click Go to resource.
Step 2: Generate CSR
|
IMPORTANT: Per the CAB Forum Guidelines for Code Signing Certificates, from June 2023, all Private Keys for Code Signing Certificates need to be stored in HSM’s which are FIPS 140 Level 2 or 3 compliant. Please make sure that RSA-HSM and EC-HSM option is enabled in your Key-Type and you should select RSA-HSM option as these keys are stored by Azure Key-vault in Managed HSM’s, which are FIPS 140 Level 2 or 3 compliant. RSA and EC options are for Software protected keys and they are not compliant with the current guidelines of CAB forum. Please read more about the Keys here. |
-
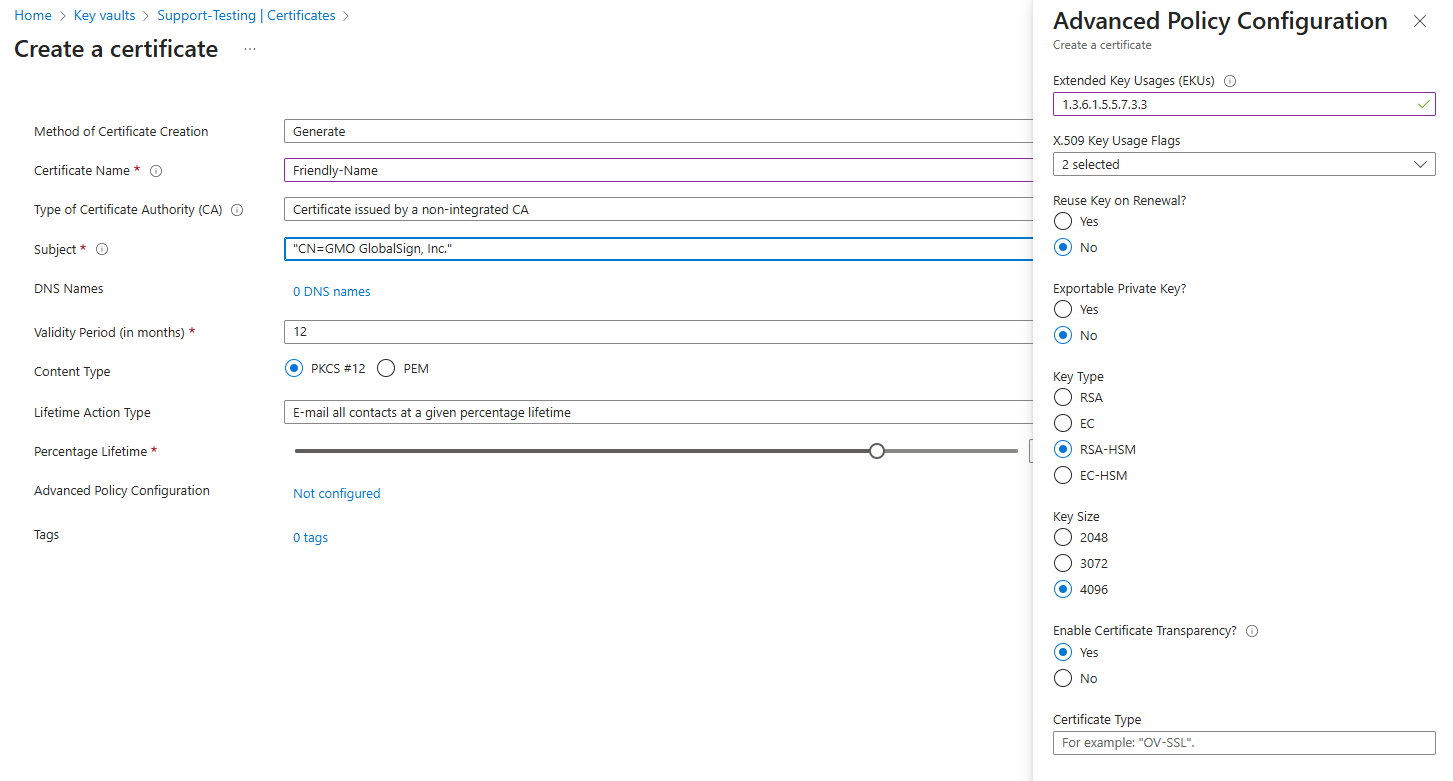
Go to your Key Vault and select Certificates, then click Generate/Import. It will take you to the Create a Certificate page.
-
Choose Generate as the Method of Certificate Creation, then enter an easy-to-memorize name in the Certificate Name field.
-
In the Type of Certificate Authority (CA) drop down menu, select Certificate issued by an non-integrated CA.
-
Set the Subject field with the common name of the certificate you are requesting (Format: CN=Common Name).
-
Fill out the rest of the fields:
• DNS Names – where you can add additional Subject Alternative Names (SANs)
• Validity Period – select how long the certificate is valid for in month designation.
• Content Type:
• PKCS#12 – Private public key pair
• PEM – Public key
• Lifetime Action Type – set certificate renewals or renewal reminders -
Advanced Policy Configuration by default is set to Not configured. Click Not Configured if you wish to add additional EKUs and set advanced key features. It will open the Advanced Policy Configuration menu.
• Extended Key Usages (EKUs): 1.3.6.1.5.5.7.3.3
• X.509 Key Usage Flags: 2 selected
• Reuse Key on Renewal? No
• Exportable Private Key? No
• Key Type: RSA-HSM
• Key Size: 4096
• Enable Certificate Transparency: Yes
Then, click OK.
-
Click Create, then a pop-up message in the right corner will confirm that the certificate is being created.
Note: You can also click on the blue information bar to monitor the generation process. -
Once the Status shows Completed, click on Certificate Operation and later Download CSR file to get a copy of your CSR.
-
Save the .csr file to your local machine.
Step 3: Submit CSR File and Download/Import Certificate
-
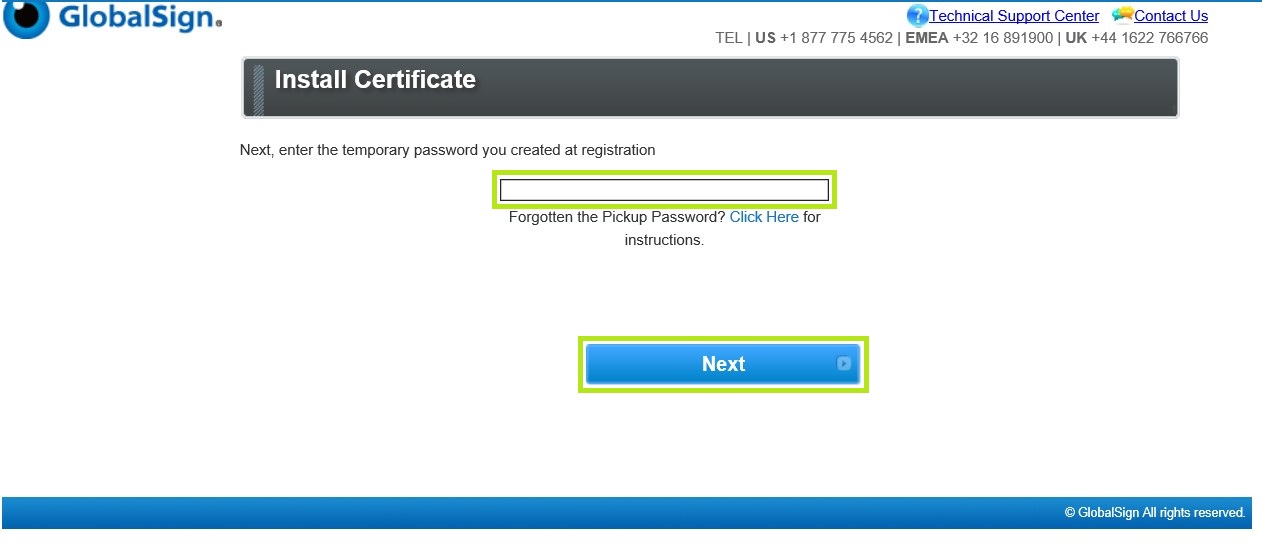
Go to your email and open the link in the Certificate Download Ready email sent to you after completing your order.
-
Enter the Temporary Pickup Password that was set at the time of ordering and click Next to continue.
-
Enter your CSR on the Enter CSR Required box. Then, tick I Agree to the subscriber Agreement and click Next to proceed.
-
Download your Digital Certificate and Intermediate Certificates.
-
Go back to Azure Key Vault and click on Merge Signed Request to import the downloaded Digital Certificate.
|
WHAT'S NEXT: Once merged, the certificate becomes fully usable in your Key Vault. You are now ready to use your certificate. To automate Code Signing with Jenkins, Azure Key Vault, and AzureSignTool, please refer to this page. |
Related Articles
SSL Configuration Test
Check your certificate installation for SSL issues and vulnerabilities.