
Sign & Encrypt Email - Microsoft Outlook 2003
Aug 25, 2025
Sign & Encrypt Email - Microsoft Outlook 2003
Article Purpose: This article provides step-by-step instructions for digitally signing and encrypting your email messages in Microsoft Outlook 2003 using a PersonalSign PKCS#12 (PFX) client digital certificate. If this is not the solution you are looking for, search for your solution in the search bar above.
Prerequisites
Before you are able to sign and/or encrypt e-mails in Outlook, you must complete the following:
- Install PersonalSign Certificate - Step 1: Download Your Certificate
- Install PersonalSign Certificate - Step 2: Locate & Install Your Certificate
- Install PersonalSign Certificate - Microsoft Outlook 2003
Signing
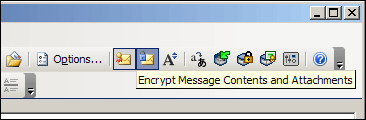
- Open a new message to begin securing your email using your client digital certificate.

- At the top of this window you will see two icons. The first is the signing icon; selecting this will sign your email with the chosen certificate. The second is the encrypting icon; selecting it will encrypt your email.
Note: you will need the public key of your recipient before you can encrypt your email.
Signing Icon Encrypting Icon
Your digital signature enables the recipient of your message to verify that you actually sent the message and that it was not altered en route. Signing your email will also give your recipient your public key, which allows your recipient to send you encrypted emails in the future. - To ensure that only the recipient can read a message you must encrypt the message. If the recipient of your signed message uses an S/MIME–enabled email package he or she can still read your message. In that case, your digital signature shows up as an attachment. The signed icon shows that the received message was signed.

The untrusted signature icon shows that the received message was signed by a certificate which was issued by a CA which you do not trust yet. This is either because you have not installed the CA's root certificate or the certificate has been revoked. Below is an example of this icon.

- You can sign your messages on a case-by-case basis or you can configure your Security Settings to always sign using a specific certificate.
Encrypting
Encrypting your email messages ensures that the message is only visible to you and the recipient. Follow the step-by-step guidelines:
- Store a copy of the recipient's certificate in your Contacts List.
- Once you have configured your Toolbar to include the Sign and Encrypt buttons, you can encrypt messages by simply clicking the encrypt button.
- Encrypted emails are distinguished by the blue padlock icon that appears in the lower-right-corner of the address pane.

Note: You can encrypt your messages on a case-by-case basis by clicking the Encryption button in the Toolbar. Alternatively, you can configure your security options so that your messages will be automatically encrypted every time you communicate with a user with whom you have exchanged and stored (in your address book) certificates.
Related Articles
SSL Configuration Test
Check your certificate installation for SSL issues and vulnerabilities.